If you have a spare room in your home you want to repurpose, or if you just want to turn your existing living room or a bedroom into a home cinema – you can.
Turning a room into a home cinema should be relatively easy. However, it will be expensive. But that’s the price you have to pay if you want to enjoy the movies the way they’re supposed to be enjoyed.
But, enough about that. Let’s take a closer look at how you can turn any room into a home cinema.
1. Paint The Walls Black

Source: hicagotribune.com
You’ll want your home cinema to be as dark as possible. Bright walls will reflect the light coming from the TV or from the projector, which will disturb you as you’re trying to watch a film.
So, grab some dark paint from your nearest paint or hardware store and get to work. The best option is certainly black, but dark browns, blues, or even deep greens and reds should do the trick.
2. Sound-Proof The Walls
Flat, naked walls are an acoustic nightmare. So, you’ll have to do something about them if you don’t want to experience echoey sound while watching a movie.
However, your options aren’t limited to just foam panels. Any type of shelving should do the trick. Also, if you’re ready for a DIY project, you can add slim wooden planks to your wall to create an uneven surface that will absorb the sound.
3. Cover Windows With Blackout Curtains

Source: quickfitblindsandcurtains.com.au
The last thing you’ll want is light reflecting off of your screen while you’re watching a movie.
If you don’t have blinds or shutters on your windows, the next best thing is to get thick, blackout curtains.
These heavy curtains could be a great addition to your living room, as they can look as stylish as they’re functional.
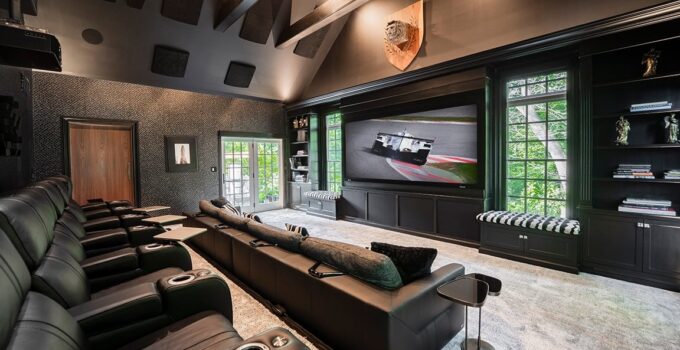
4. Get A Comfortable Sofa

Source: livingcozy.com
You have to be comfortable while watching a film. If comfort didn’t matter, cinemas would just install wooden benches and have you sit on them.
So, if you really want to enjoy a film – get a comfortable sofa. If you really want to ball out and get super cosy, a recliner chair with a cup holder and a leg rest is the way to go.
5. Wall-Mount A TV
It’s not really cinema-like if your TV’s resting on a TV shelf.
Even if you’re turning your living room into a home theatre, make sure to mount the TV onto a wall.
It takes up less space, it looks good, and you can set it at a perfect height and angle so you can enjoy your films in the best way possible.
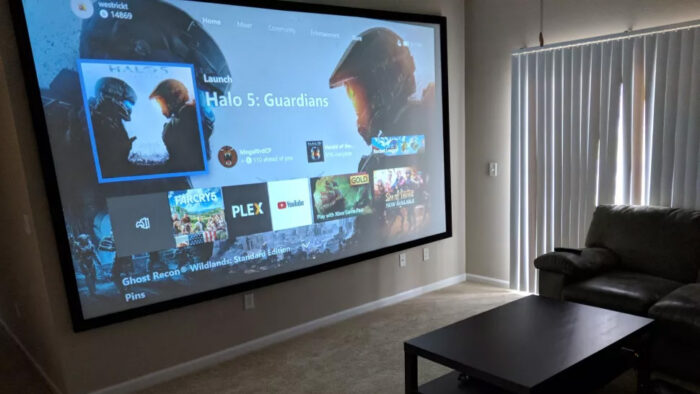
6. Get A Projector
Source: whattowatch.com
If you have money to spend and you don’t really care about the image that much – you can get a projector.
These usually work best in designated home theatres if the room is super dark and the projector is properly mounted and positioned, but we guess you could make it work in a bedroom, too.
Just make sure you buy a really good one; otherwise, you’ll count the pixels on your wall.
7. Buy Some Quality Speakers
Sound is equally as important as the picture, so get yourself some good speakers. If you’re really serious about it, make sure you get a surround sound system – at least 7.1 surround.
Properly position your speakers and test them before you permanently mount them. Most of the top-of-the-line surround sound systems will come with diagnostics software that will let you properly set them up, so don’t skip that part.
8. Soundbar Should Also Do The Trick

Source: pcmag.com
If you’re turning a living room or a bedroom into a home cinema – a soundbar should do the trick.
Soundbars these days get pretty remarkable, but they don’t come cheap. So, be prepared to spend quite a bit of money if you want the best audio you can get from a single speaker.
9. Elevate Your Experience With A Haptic Vest
If you want to feel the bass but you don’t want to disturb your neighbours or household members, you should probably consider getting a haptic vest.
A haptic vest like the Woojer Vest, which review you can check out below, is a wearable piece of tech that will pump the bass through your body, elevating your audio experience to another level. Think of it as the closest you can get to a 4D movie-watching experience in your home.
10. Install Ambient Lights
While you need your room to be as dark as possible, we don’t mind some ambient lights – as long as they don’t disturb you while watching a movie.
Ambient lights are a good way for you to navigate the room if you have to leave or at least until you reach the light switch after the movie has ended.
And, if you’re really into that sort of stuff – ambient light may add to the overall vibe of the room. But that’s up to you.
11. Don’t Forget A Snack Bar

Source: granviahotel.com
While we don’t expect you to have a full-on vending machine in your home (although why not), a mini snack bar for your home cinema is always a good idea.
We all know how delicious snacks feel while we’re watching a movie, so it’s only natural for us to keep some snacks and refreshing drinks in the home theatre, right?
A shelf with some snacks or a mini-fridge with sodas and water should do the trick.
12. DIY As Much As You Can
As we’ve said, turning a room into a home cinema will be quite expensive. Therefore, we’d urge you do to as much as you can to lower those costs. How? By doing it yourself.
Some of these things can be fun little DIY projects that you can do without any issues. Soundproofing the walls, painting the room, and setting up ambient lights – all of those can be done with minimal effort and in a few days.
You just have to try.
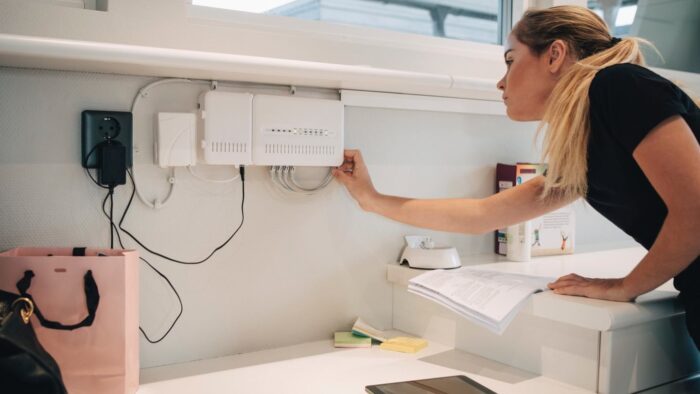
13. Set Up High-Speed Internet
Source: allconnect.com
If you’re streaming your movies and TV shows (and you most likely are), you’re going to need high-speed internet if you want to avoid buffer.
We would recommend using a wired connection to avoid the dips in speed and some latency issues, but if you don’t have a good way to hide the cables, then you’ll have to invest in some premium-rate wife routers or signal boosters to ensure stable connection and pleasant viewing experience.
Conclusion
Are you eager to start working on your new project? We know we were.
Believe us, it might seem like a lot to do at first, but it really isn’t. Once you get going, the whole project shouldn’t take more than two weeks, even if you’re starting from scratch. So, go for it.
You’ll thank yourself later.


